

How To Repair Laminate Furniture
I'g a Northern California native who can offer insider tips on the best SF angling locations.
Tips on how to repair wood veneer.
K9keystrokes
Typical Issues: Warped & Bubbled Veneer
Whatsoever slice of furniture that has a woods laminate or veneer finish is subject to a number of types of damage. Every bit this material ages, the changes in humidity and temperature, or damage from injury, can cause the laminate to loosen (pull away) from the base forest it has been adhered to. Blistering—trivial bubbles that form under the laminate surface—is another likely problem.
These ii bug (or defects) are generally pretty piece of cake to repair, but you want to prepare loose and/or bubbled veneer as soon as possible and before the problem gets actually bad. Today, nosotros volition be discussing how to repair these troubling veneer issues easily at home.
2 Common Wood Laminate Veneer Repairs
Because veneer is brittle and actually really frail, any pocket-size damage tin quickly turn into a serious (or even irreparable) problem if not attended to right abroad. Loose veneer, equally an case, is more likely to split and flake when information technology is lifted away from the woods base than when it is deeply glued down. Let's have a look at how to repair the 2 nearly common veneer issues:
- Loose Veneer
- Bubbled (Blistered) Veneer
How to Repair Loose Wood Laminate Veneer
Earlier we get started working on loose veneer, remember that this textile is very thin; it tin can hands be broken and needs some special precautions. So, the commencement thing you want to do earlier beginning Whatever type of veneer repair is to get the veneer pliable before starting any of the work.
Step ane: Make the Veneer More Pliable
- Identify a damp cloth on acme of the laminate area you lot will be working on.
- Adjacent, place a hot iron on the cloth. This will strength moisture into the veneer, which makes it more than flexible and much less likely to split or crack as you do your repair.
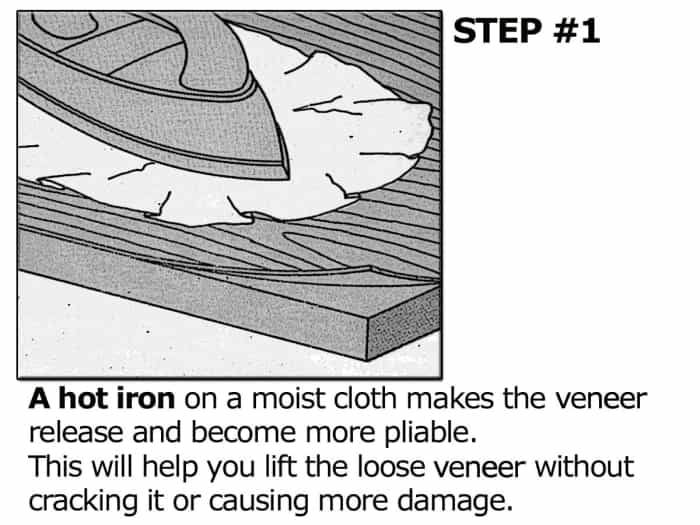
For loose veneer: use steam to get the veneer pliable again.
K9keystrokes
Footstep 2: Scrape Out and Replace the One-time Gum
- Afterward steaming wet into the laminate, carefully scrape out the old glue from off of the base wood and the dorsum of the veneer using a small knife, working it dorsum as far as you safely can get it to become.
- If the glue just won't come up off, clasp hot water from a sponge nether the loose piece of veneer. The water will eventually melt the mucilage and so y'all can then remove it using the knife. Wipe off any excess moisture.
- Re-attach the veneer by calculation fresh white (wood) mucilage, and so put a slice of plastic over the repaired area. This keeps any glue that squeezes out from sticking to whatsoever clamping device you use to concord the repair in place while the mucilage sets (virtually 8 hours).
- Afterwards the glue has set, wash off whatever excess gum from the surface using a hot water-soaked sponge.

For loose veneer: Scrape onetime glue out and replace with new white wood glue between the veneer and wood base.
K9keystrokes
Stride three: Clamp to Secure the Veneer
- If you don't take an actual clamping device, you tin can substitute by winding masking tape around the repaired area.
- If you don't have a clench, and the tape won't work, merely utilise a weight—e.g. a sandbag or a toolbox—to secure the expanse until the glue sets. Permit the glue to gear up for about eight hours no matter which bonding technique you use.
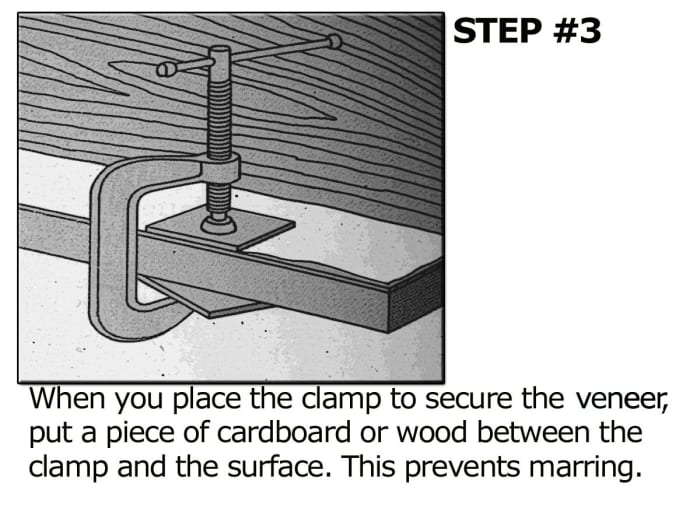
For loose veneer: Place a piece of plastic on top of repaired surface area, use a piece of paper-thin under a clamp jaw to prevent marring and hold the repair until the mucilage sets (almost 8 hours).
K9keystrokes
What Would Y'all Practise?
How to Repair Bubbled or Blistered Wood Laminate Veneer
Just like with loose veneer, you volition need to get the material pliable so you tin work with it without causing farther damage. Here'southward a reminder: Get the veneer pliable before starting whatsoever of the piece of work.
- Place a damp fabric on top of the laminate surface area you volition be working on.
- Next, place a hot iron on the cloth. This will force moisture into the veneer, which makes it more flexible and much less probable to split or cleft every bit yous do your repair.
Step 1: Flatten the Bubble
- After steaming the laminate material to go it pliable, identify a damp cloth over the bubbled (blistered) area. Then, cut a slit into the superlative of the bubble.
- Printing on the bubble to allow any backlog air to escape through the slit.
Scroll to Continue
Read More From Dengarden
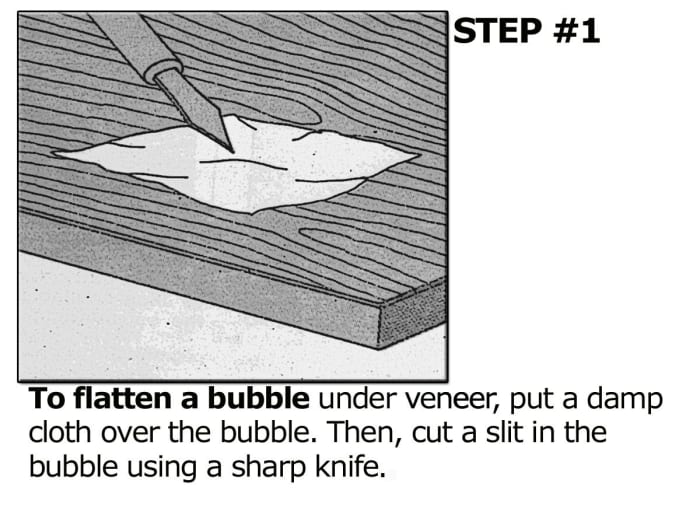
For bubbled veneer: Identify a damp cloth over the bubble. Cut a slit in the bubble to release trapped air.
K9keystrokes
Step 2: Add Gum
- Squeeze white (wood) glue into the slit, making sure to get the glue on both the underside of the veneer and the woods base.
- Press the veneer back into place.
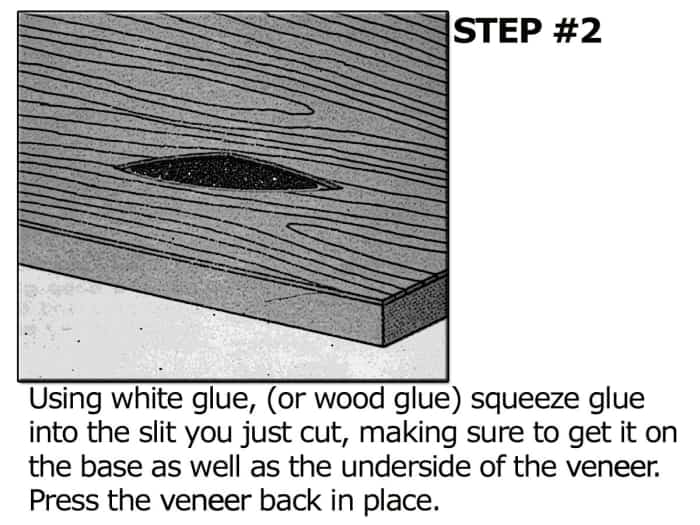
For bubbled veneer: Squeeze white (forest) glue into the slit and press veneer back into place.
K9keystrokes
Step iii: Clench to Secure the Bond
- If yous don't have a clamp, or masking tape won't work, use whatsoever weighted detail (sandbag, tool kit, tackle box, etc.) to secure the bail.
- Let the gum set for nigh 8 hours.
- Wipe any excess glue off using a sponge soaked with hot water. Be certain to dry off any backlog water so as not to cause farther damage.

For bubbled veneer: Place a weighted object on the repaired expanse for near 8 hours to assure that the gum sets properly. Wipe off dry glue from repaired expanse with hot water. Dry area completely.
K9keystrokes
All-time of Luck on Your Home Repairs!
I promise yous found the simple techniques for repairing your own veneer promising. I was able to restore an erstwhile side table then it could be used in our family room and non tossed into the garage-sale pile! Although, it would have brought u.s. a much higher price with the repairs completed . . . hmm. Maybe repairing veneer can exist a money-making venture afterwards all!
This commodity is authentic and truthful to the all-time of the author's cognition. Content is for informational or amusement purposes simply and does not substitute for personal counsel or professional advice in business, financial, legal, or technical matters.
© 2022 India Arnold
India Arnold (author) from Northern, California on January 30, 2022:
tillsontitan~So glad yous found the info helpful. I appreciate yous sharing your thoughts and for the votes!
Cheers~
K9
Mary Craig from New York on January 28, 2022:
Outstanding, oh, and good data too. Seriously well done and very helpful. Video was great with music that kept you lot going, just you don't need me to tell you how not bad this whole hub is. Voted upwards, useful, beautiful. Thanks f or sharing!
Republic of india Arnold (author) from Northern, California on January 24, 2022:
livelonger~ So nice to see yous made it by today! (Smiling) Stoked that y'all found the video hub up to your high standards! Veneer is pretty easy to set up when yous have fifty-fifty a piddling information! Thanks for sharing your thoughts my friend!
HubHugs and Shalom~
K9
Jason Menayan from San Francisco on January 24, 2022:
What a terrific guide to prepare a vexing problem. We accept plenty of veneered surfaces in our place, and I know that peeling and bubbled veneer can ruin the look of a smoothen surface. You've demonstrated beautifully how these can be fixed without a whole lot of complication. Thank you, HubHugs and Shalom!
Republic of india Arnold (author) from Northern, California on January 21, 2022:
Simone~ I am so pleased that you find the veneer repair video worthy of mention. I enjoy making these guides and am so thrilled that HubPages is testing and will be offering video as an option! Than yous for making information technology by and sharing your very uplifting thoughts!
HubHUgs~
K9
Simone Haruko Smith from San Francisco on January 20, 2022:
WOW K9keystrokes! This guide is fantastic! I didn't fifty-fifty know it was possible to repair veneer- I had simply causeless that was the end of a table or what have you lot. The video is stellar. Yous rock!
India Arnold (author) from Northern, California on January xix, 2022:
I simply adore a piffling HubLove, steph! I'm honored to have admission to such a loftier quality link.
Thanks~
K9
Republic of india Arnold (author) from Northern, California on January xix, 2022:
Steph~ You are as well kind. I am actually glad you find the work upward to your high standards. I promise your hubby has a great time doing a few honey-do'southward for you!
HubHugs~
K9
Stephanie Marshall from Curve, Oregon on January 19, 2022:
And thank you for the link to my interior pigment hub too!
Stephanie Marshall from Curve, Oregon on January 19, 2022:
You are amazing (bow, bow, bow) - I am awed by your video and illustrations. Yous might even convince me to convince my husband to try this DIY wood veneer repair projection. :)
Rated up! Best as always, Steph
India Arnold (author) from Northern, California on January 19, 2022:
Cardisa! Thanks for making it by. I appreciate the support and your kind comments. Bummed that you lot're not in this weeks WTI. But, I will be looking for you lot in next weeks topic! ;)
HubHugs~
K9
India Arnold (author) from Northern, California on January 19, 2022:
LOL! Ain't HubLove G! I capeesh that you shared the laminate tips with your woodworking hubby, that is quite a complement I am happy to accept. Cheers for sharing your fun comments, and I gotta tell ya, your Redneck Ornamentation Hubs are too funny! Great stuff!
HubHugs~
K9
Carolee Samuda from Jamaica on January nineteen, 2022:
You are so awesome! This is a wonderful tutorial. I don't accept veneer stuff just I enjoyed the reading but the same.
Tammy on January xix, 2022:
HAHAHA! I had a comment all prepared until I seen the title of my hub linked here. Then I had a brain fart and had to finish and think. Thanks for the link!
These are some great tips. My hubby works with forest and has tried a few of these tricks. (I still told him your tips anyway.) I similar how yous added the video and instructions to your hub. It actually helps for those of the states...I mean me...to requite information technology a whirl. Thanks over again!
Bharat Arnold (author) from Northern, California on Jan 19, 2022:
dipless~ LOL! Too funny. Glad yous constitute the veneer repair pointers worth the read. I sure appreciate yous sharing your thoughts here.
Cheers~
K9
dipless from Manchester on January 19, 2022:
Such a great hub, with an fantabulous Video, I had U2 Height on at the aforementioned fourth dimension and it added a new level of excitement to repairing laminate flooring. Using a moisture textile on the laminate to go far pliable is something which would take simply completely escaped me, great tip, bully hub. Thanks
Source: https://dengarden.com/home-improvement/Laminated-Wood-Veneer-Home-Repairs-for-Bubbled-or-Loose-Veneer-video
0 Response to "How To Repair Laminate Furniture"
Post a Comment